
![]()
The best way to design logos is to use a design application like Illustrator (a vector-based tool). However for some that is too expensive so they fall back on an illegal copy of Photoshop (not recommended) or they use GIMP (recommended). Photoshop and GIMP are raster-based design tools which means you won’t be able to scale finished logos without them becoming pixelated.
In this tutorial I decided to show how it’s possible to create logos using SVG (Scalable Vector Graphic file format). The advantage of this is you can resize the SVG version of your logo and it will never become pixelated or lost quality.
I’ve had a logo flying around for a long time that I use for a property rental website I run. It was raster-based for quite a few years until yesterday when I redesigned it using SVG. Let me take you through the steps I took here.
Top Tip: Always make sure your logos are vector-based so that they resize well in any medium.
So let’s go. Let’s design a logo using SVG!
1. Choosing a Logo
This method works best if you have a simple logo. In this context I am defining a simple logo as a logo that consists of:
- Basic geometric shapes (circle, squares, rectangles, triangles etc)
- Simple colour schemes (i.e. not too much shading)
The logo should also be raster-based. If it’s vector-based then you don’t really need to make it into SVG, however you can still continue if you feel you’ll enjoy learning about SVG.
The logo I have chosen is as follows:

This is a raster-based logo. We can tell this if we zoom in to the logo (here by 400%):
![]()
Note how we can see the pixels which makes it look blocky. It looks fine at the original scale (previous image) because our eye smooths out the pixels. The eventual SVG logo will look good at any zoom-factor because it redraws itself every time it’s resized.
2. Draw a Draft Version using an SVG Editor
The best tool I found to start making a mock-up was this SVG editor: http://www.drawsvg.org/. It’s easy to use because it doesn’t require an install and should work on any computer (i.e. PC, Mac or Linux etc).
Using SVG we can specify different shapes. For our logo we will be starting with a circle.
Creating the Turquoise Circle
Drawing the Circle
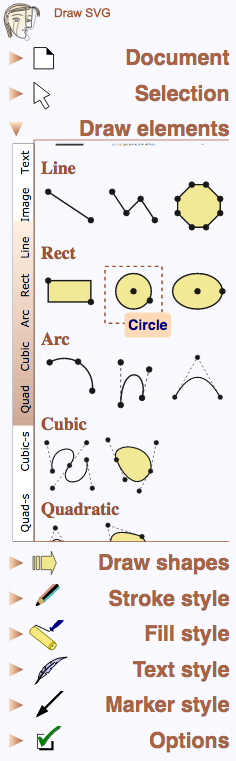
- Open up the Draw elements menu as seen below
- Select Circle
You will then need to draw the first part of the logo, the blue / turquoise circle.
With the circle tool selected:
- Click and hold the mouse pointer in the centre of the canvas (the white area on the right of the menus / tools), and then drag outwards until you are happy with the size of the circle
- Then click to set the circle to this size
The next option is to make the circle with the correct colour.
Colouring the Circle
We first need to determine the exact colour of the circle. We can use another package called GIMP to achieve this. I will explain this in a later lesson. For now I will tell you that the colour is defined by the hex code #49B1BD.
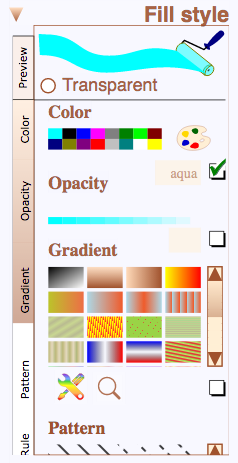
To make the circle this colour we need to select Fill style from the menu in the SWG drawing program. See below:
Now click on the palette icon in SVG draw. It looks like this:
![]()
The Color dialog will appear see below…
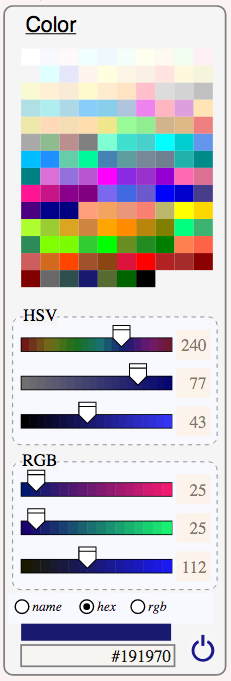
- Ensure that the hex radio button is selected at the bottom of this dialog.
- Click in the text field which is beneath the radio buttons to the left of the power button symbol (in the diagram it says ‘white’ in the text field)
- Type #49B1BD into the text field
- The colour bar (the bar above the text field which is blue in the Colour Dialog figure) should change to the correct colour
- Now click on the colour bar to make the circle change to this colour
Now we need to remove the default black line around the circle. To do this click on Stroke style in the menu:
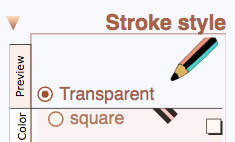
Ensure that the Transparent radio button is selected. This will make the black stroke around the circumference of the circle disappear.
We have now completed the first phase which is the circle part of the logo.
We now need to create the house part of the logo.
Drawing the House
The house can be broken up into two sections, namely the roof, and the house front. They are made up of shapes as follows:
Roof
- White triangle (the roof)
- White rectangle (the chimney)
House Front
- White rectangle (the front face of the house)
- Turquoise rectangle (the door)
I will now leave you to draw these elements. Remember that the hex colour code for turquoise is #49B1BD. You will need this for the door.
Now you have finished you should be able to save the SVG file.
Saving the SVG File
Select the Document menu in SVG draw as shown below, then click Save.
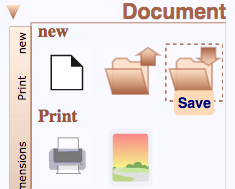
Hopefully you can work out how to save the file.
We now have a draft version of the logo. The colours are exact but the shapes probably aren’t.
The next step is to edit the SVG file itself and to do some maths.
Maths of the Logo
In GIMP you need to work out the coordinates of all points relating to the four shapes that make up the house, namely the points that make up the Roof, Chimney, Front Face and Door.
I used GIMP to do this. If you load the original image you can find the coordinate by hovering the cursor over each pixel. In the statusbar of GIMP it will give you a coordinate of the current pixel. Like 22, 44 etc. The first number is the x-coordinate and the second the y-coordinate. You need to find the coordinates of each corner of the four shapes.
I made notes like this:
Roof
- 11, 22
- 27.5, 7 (note the half value. The apex of the roof in the original is two pixels wide, meaning we take the average coordinate of both those pixels (the pixel coordinates are 27, 7 and 28, 7).
- 46, 22
Repeat this for all other points of the four shapes.
Editing the SVG File
The SVG draw application created the .svg file for us. We can now edit this directly in a text editor and ensure that the shapes are exactly the same as the original logo.
Use your text editor of choice, I use Sublime Text on my Mac.
After reformatting the file so it looks nice, and adding the final coordinates we measured, the final result is:
<!-- Cardiff Renting Logo (House) -->
<!-- Both the logo and this SVG code are Copyright Technology Wales and Cardiff Renting 2015 -->
<svg xmlns="http://www.w3.org/2000/svg" xmlns:xlink="http://www.w3.org/1999/xlink" width="100%" height="100%" viewBox="0 0 570 570" preserveAspectRatio="xMidYMid meet" zoomAndPan="disable" >

    <!-- Logo Circle -->
	<circle id="e1_circle" cx="285" cy="285" style="vector-effect: non-scaling-stroke; stroke-width: 1px;" r="285" fill="#49B1BD"/>

    <!-- House Front -->
	<rect x="110" y="250" id="e2_rectangle" style="stroke-width: 1px; vector-effect: non-scaling-stroke;" width="360" height="200" fill="white" ry="0" rx="0" />

    <!-- Roof -->
	<polygon id="e3_polygon" style="vector-effect: non-scaling-stroke;" points="110 230 280 70 470 230" fill="white" />

    <!-- Door -->
	<rect x="260" y="340" id="e4_rectangle" style="stroke-width: 1px; vector-effect: non-scaling-stroke; stroke: none;" width="60" height="120" fill="#49B1BD" ry="0" rx="0"/>

    <!-- Chimney -->
	<rect x="395" y="120" id="e5_rectangle" style="stroke: none; stroke-width: 1px; vector-effect: non-scaling-stroke;" width="35" height="100" fill="white"/>

</svg>
The SVG file displays as below. If you click on the logo below, then right mouse click on it, then select ‘View Source’ you will see the SVG code.
![]()